使用树莓派搭建K8S集群(ARM64架构,附安装脚本)
为了能够更好的学习K8S,王道还是得自己动手
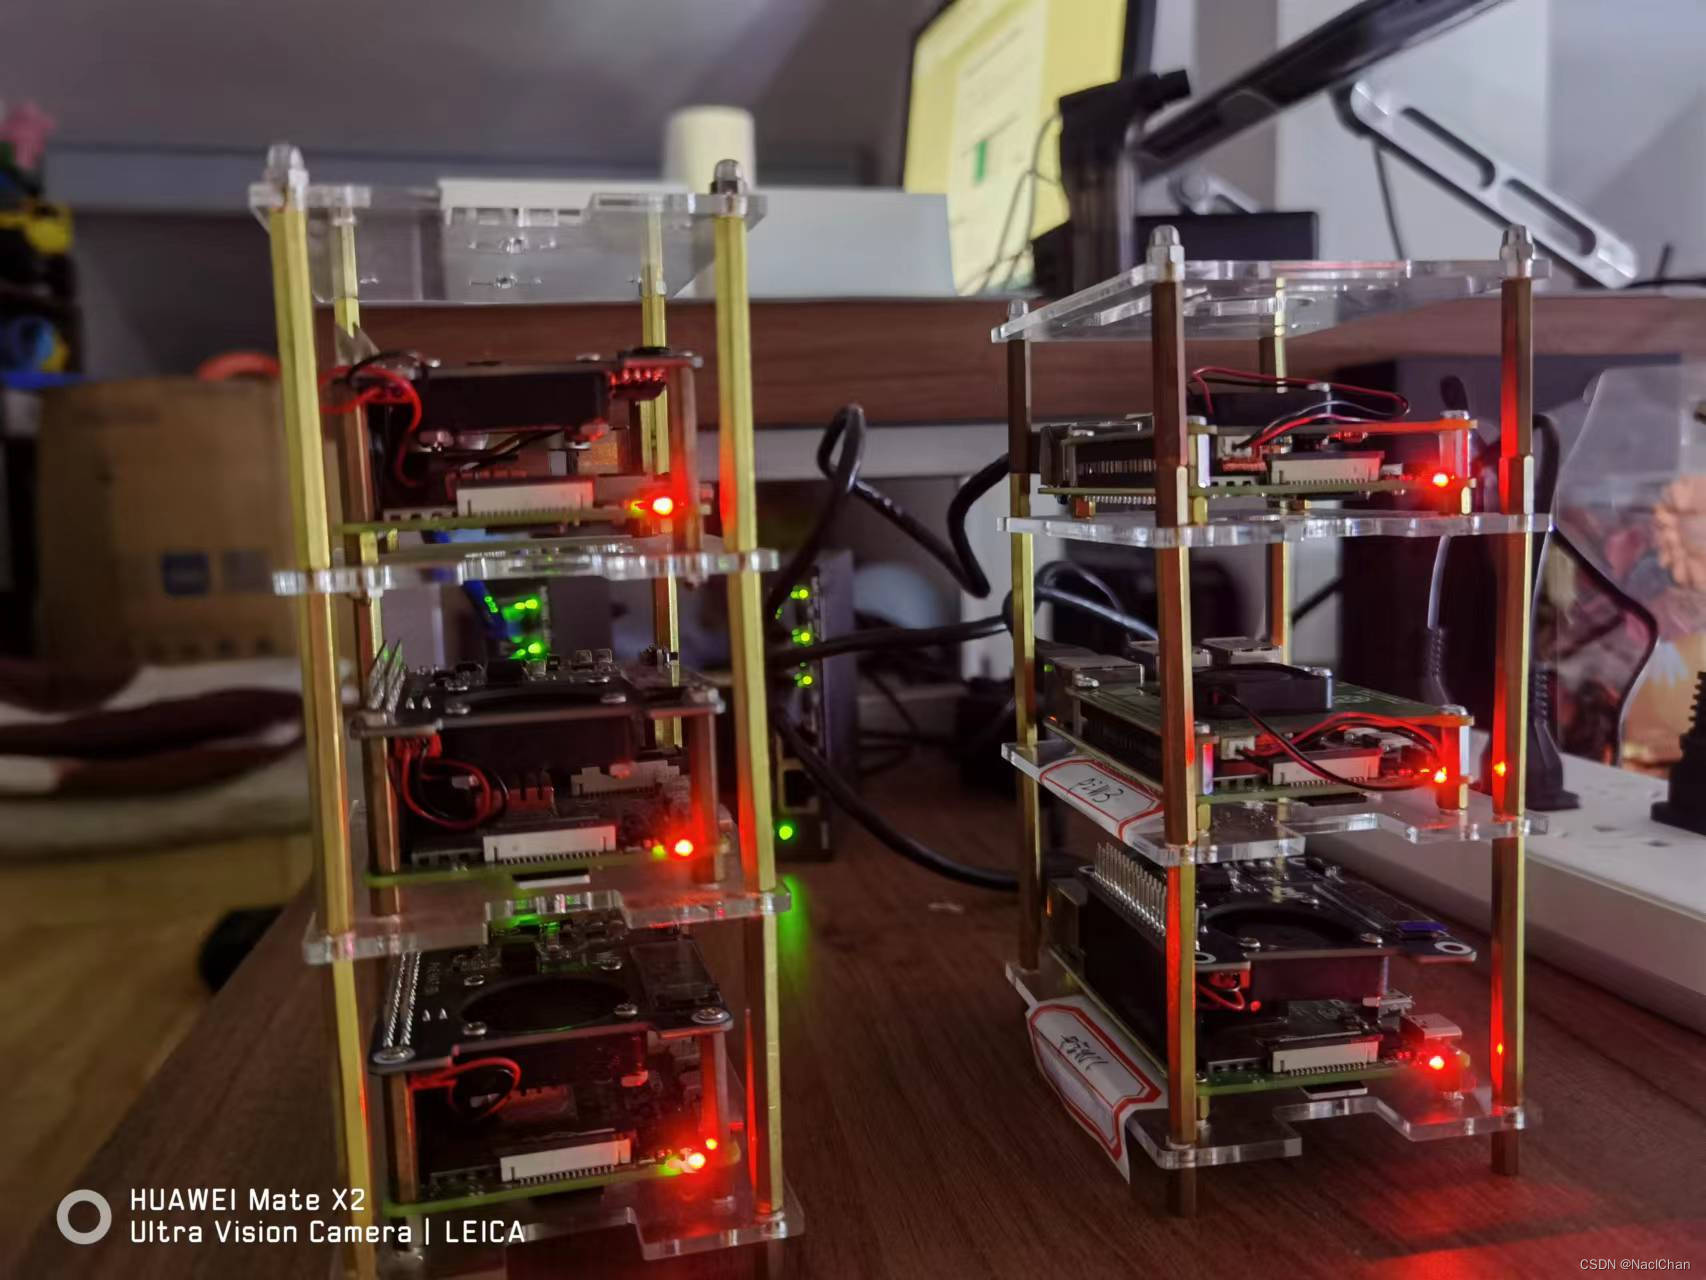
在虚拟机上玩K8S,没啥感觉。决定挑战自己,然后买了6个树莓派,在真实的硬件上从零开始搭建部署K8S。以下内容在自己的树莓派集群上经过充分验证,没毛病。成品如下图:

树莓派供电用的是带POE功能的交换机,每一个树莓派都配备了POE HAT(可淘宝搜索,100左右一只)
废话不多说,直接上干货
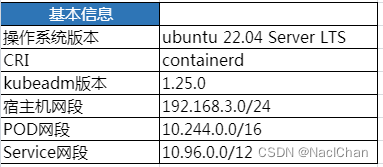
1. 各树莓派节点的规划设计:

2. 各节点基本情况:

3. 首先选择一个节点当做load balance,我这里选择的是piW3节点。这个节点后续还会承担harbor镜像库、nfs服务器等职责,为搭建CICD做准备。说白了,piW3就是个集中存储区
#切换root用户,在每一个节点安装之前,手动切换为su用户
#sudo su -

#首先设置echo输出的各种颜色和格式
COLOR_START='echo -e 33[35;49m'
COLOR_END='33[0m'

${COLOR_START}"安装Nginx"${COLOR_END}
apt install nginx -y

cd /etc/nginx
${COLOR_START}"配置Nginx"${COLOR_END}
nano nginx.conf

stream {
    include stream.conf;
}

${COLOR_START}"增加新内容,这三台的IP就是我们的三台master的IP,端口都设置了6443"${COLOR_END}
nano stream.conf
upstream k8s-apiserver {
    server 192.168.3.101:6443;
    server 192.168.3.102:6443;
    server 192.168.3.103:6443;
}


${COLOR_START}"检查Nginx"${COLOR_END}
nginx -t

${COLOR_START}"重启Nginx"${COLOR_END}
systemctl restart nginx

${COLOR_START}"删除文件夹,防止Nginx报错"${COLOR_END}
cd sites-enabled
rm -rf default

${COLOR_START}"重启Nginx"${COLOR_END}
systemctl restart nginx

${COLOR_START}"查看Nginx运行状态"${COLOR_END}
ps -ef | grep nginx
4. 在主控节点上部署K8S,我这里选择的是piM1。piM1在集群中除了承担主节点的职责以外,还安装了NAT,方便进行外网穿梭。在外面的时候,也能方便的访问集群。NAT我选的是花生壳,自己申请了域名(NAT教程网上很多,自行搜索)
#切换root用户,在每一个节点安装之前,手动切换为su用户
#sudo su -

#首先设置echo输出的各种颜色和格式
COLOR_START='echo -e 33[35;49m'
COLOR_END='33[0m'

${COLOR_START}"更新软件源,全部切换为阿里云"${COLOR_END}
cat > /etc/apt/sources.list <<EOF
deb http://mirrors.aliyun.com/ubuntu-ports/ jammy main restricted universe multiverse
deb-src http://mirrors.aliyun.com/ubuntu-ports/ jammy main restricted universe multiverse
deb http://mirrors.aliyun.com/ubuntu-ports/ jammy-updates main restricted universe multiverse
deb-src http://mirrors.aliyun.com/ubuntu-ports/ jammy-updates main restricted universe multiverse
deb http://mirrors.aliyun.com/ubuntu-ports/ jammy-security main restricted universe multiverse
deb-src http://mirrors.aliyun.com/ubuntu-ports/ jammy-security main restricted universe multiverse
deb http://mirrors.aliyun.com/ubuntu-ports/ jammy-backports main restricted universe multiverse
deb-src http://mirrors.aliyun.com/ubuntu-ports/ jammy-backports main restricted universe multiverse
EOF

${COLOR_START}"检查更新及安装更新"${COLOR_END}
apt update
apt upgrade -y

${COLOR_START}"安装语言包"${COLOR_END}
apt-get install language-pack-en
apt-get install language-pack-zh-hans

${COLOR_START}"设置HOST的模板文件"${COLOR_END}
cat >> /etc/cloud/templates/hosts.debian.tmpl <<EOF
192.168.3.101 piM1
192.168.3.102 piM2
192.168.3.103 piM3
192.168.3.111 piW1
192.168.3.112 piW2
192.168.3.113 piW3
EOF

${COLOR_START}"关闭SWAP"${COLOR_END}
swapoff -a
sed -i '/ swap / s/^(.*)$/#1/g' /etc/fstab

${COLOR_START}"添加加载的内核模块"${COLOR_END}
tee /etc/modules-load.d/containerd.conf<<EOF
overlay
br_netfilter
EOF

${COLOR_START}"加载内核模块"${COLOR_END}
modprobe overlay
modprobe br_netfilter

${COLOR_START}"设置并应用内核参数"${COLOR_END}
tee /etc/sysctl.d/kubernetes.conf<<EOF
net.bridge.bridge-nf-call-ip6tables = 1
net.bridge.bridge-nf-call-iptables = 1
net.ipv4.ip_forward = 1
EOF

sysctl --system

${COLOR_START}"curl gnupg2 software-properties-common apt-transport-https ca-certificates"${COLOR_END}
apt install -y curl gnupg2 software-properties-common apt-transport-https ca-certificates

${COLOR_START}"安装GPG证书"${COLOR_END}
curl -fsSL https://download.docker.com/linux/ubuntu/gpg |  apt-key add -

${COLOR_START}"写入软件源信息并更新"${COLOR_END}
add-apt-repository "deb [arch=arm64] https://download.docker.com/linux/ubuntu $(lsb_release -cs) stable"
apt update

${COLOR_START}"安装containerd"${COLOR_END}
apt install -y containerd.io

${COLOR_START}"生成containetd的配置文件"${COLOR_END}
#结果数据全部丢弃(重定向到空文件),2>&1代表错误信息输出到标准输出上
containerd config default | tee /etc/containerd/config.toml >/dev/null 2>&1

${COLOR_START}"修改cgroup Driver为systemd"${COLOR_END}
sed -i 's/SystemdCgroup = false/SystemdCgroup = true/g' /etc/containerd/config.toml

${COLOR_START}"将镜像源设置为阿里云 google_containers 镜像源"${COLOR_END}
sed -i 's/k8s.gcr.io/registry.aliyuncs.com/google_containers/g' /etc/containerd/config.toml

${COLOR_START}"containerd重启及服务永久启动"${COLOR_END}
systemctl restart containerd
systemctl enable containerd

${COLOR_START}"添加apt-key"${COLOR_END}
curl https://mirrors.aliyun.com/kubernetes/apt/doc/apt-key.gpg | apt-key add -

${COLOR_START}"添加Kubernetes的apt源为阿里云的源并更新"${COLOR_END}
#将xenial修改为了jammy,jammy的版本还不成熟,又改回了xenial
apt-add-repository "deb https://mirrors.aliyun.com/kubernetes/apt/ kubernetes-xenial main"
apt update

${COLOR_START}"安装kubelet kubeadm kubectl"${COLOR_END}
apt install -y kubelet kubeadm kubectl
apt-mark hold kubelet kubeadm kubectl
kubeadm version

${COLOR_START}"开启路由功能"${COLOR_END}
sysctl -w net.ipv4.ip_forward=1

${COLOR_START}"初始化kubernetes,指定版本号为最新版1.25.2,192.168.3.113为k8s-lb-nginx负载均衡机器的IP"${COLOR_END}
kubeadm init
--kubernetes-version=v1.25.2
--image-repository registry.aliyuncs.com/google_containers --v=5
--control-plane-endpoint "192.168.3.113:6443"
--upload-certs
--service-cidr=10.96.0.0/12
--pod-network-cidr=10.244.0.0/16

${COLOR_START}"设置K8S"${COLOR_END}
mkdir -p $HOME/.kube
cp -i /etc/kubernetes/admin.conf $HOME/.kube/config
chown $(id -u):$(id -g) $HOME/.kube/config

${COLOR_START}"导出K8S设置"${COLOR_END}
export KUBECONFIG=/etc/kubernetes/admin.conf

${COLOR_START}"查看K8S安装信息"${COLOR_END}
kubectl cluster-info
kubectl get nodes

reboot

${COLOR_START}"所有节点全部安装完毕后,再进行验证"${COLOR_END}
kubectl create deployment demoapp --image=registry.cn-hangzhou.aliyuncs.com/raymond9/demoapp:v1.0 --replicas=3
5. 在另外两个次主控节点上部署K8S,我选择了piM2,piM3作为次主控节点。脚本如下
#切换root用户,在每一个节点安装之前,手动切换为su用户
#sudo su -

#首先设置echo输出的各种颜色和格式
COLOR_START='echo -e 33[35;49m'
COLOR_END='33[0m'

${COLOR_START}"更新软件源,全部切换为阿里云"${COLOR_END}
cat > /etc/apt/sources.list <<EOF
deb http://mirrors.aliyun.com/ubuntu-ports/ jammy main restricted universe multiverse
deb-src http://mirrors.aliyun.com/ubuntu-ports/ jammy main restricted universe multiverse
deb http://mirrors.aliyun.com/ubuntu-ports/ jammy-updates main restricted universe multiverse
deb-src http://mirrors.aliyun.com/ubuntu-ports/ jammy-updates main restricted universe multiverse
deb http://mirrors.aliyun.com/ubuntu-ports/ jammy-security main restricted universe multiverse
deb-src http://mirrors.aliyun.com/ubuntu-ports/ jammy-security main restricted universe multiverse
deb http://mirrors.aliyun.com/ubuntu-ports/ jammy-backports main restricted universe multiverse
deb-src http://mirrors.aliyun.com/ubuntu-ports/ jammy-backports main restricted universe multiverse
EOF

${COLOR_START}"检查更新及安装更新"${COLOR_END}
apt update
apt upgrade -y

${COLOR_START}"安装语言包"${COLOR_END}
apt-get install language-pack-en
apt-get install language-pack-zh-hans

${COLOR_START}"设置HOST的模板文件"${COLOR_END}
cat >> /etc/cloud/templates/hosts.debian.tmpl <<EOF
192.168.3.101 piM1
192.168.3.102 piM2
192.168.3.103 piM3
192.168.3.111 piW1
192.168.3.112 piW2
192.168.3.113 piW3
EOF

${COLOR_START}"关闭SWAP"${COLOR_END}
swapoff -a
sed -i '/ swap / s/^(.*)$/#1/g' /etc/fstab

${COLOR_START}"添加加载的内核模块"${COLOR_END}
tee /etc/modules-load.d/containerd.conf<<EOF
overlay
br_netfilter
EOF

${COLOR_START}"加载内核模块"${COLOR_END}
modprobe overlay
modprobe br_netfilter

${COLOR_START}"设置并应用内核参数"${COLOR_END}
tee /etc/sysctl.d/kubernetes.conf<<EOF
net.bridge.bridge-nf-call-ip6tables = 1
net.bridge.bridge-nf-call-iptables = 1
net.ipv4.ip_forward = 1
EOF

sysctl --system

${COLOR_START}"curl gnupg2 software-properties-common apt-transport-https ca-certificates"${COLOR_END}
apt install -y curl gnupg2 software-properties-common apt-transport-https ca-certificates

${COLOR_START}"安装GPG证书"${COLOR_END}
curl -fsSL https://download.docker.com/linux/ubuntu/gpg |  apt-key add -

${COLOR_START}"写入软件源信息并更新"${COLOR_END}
add-apt-repository "deb [arch=arm64] https://download.docker.com/linux/ubuntu $(lsb_release -cs) stable"
apt update

${COLOR_START}"安装containerd"${COLOR_END}
apt install -y containerd.io

${COLOR_START}"生成containetd的配置文件"${COLOR_END}
#结果数据全部丢弃(重定向到空文件),2>&1代表错误信息输出到标准输出上
containerd config default | tee /etc/containerd/config.toml >/dev/null 2>&1

${COLOR_START}"修改cgroup Driver为systemd"${COLOR_END}
sed -i 's/SystemdCgroup = false/SystemdCgroup = true/g' /etc/containerd/config.toml

${COLOR_START}"将镜像源设置为阿里云 google_containers 镜像源"${COLOR_END}
sed -i 's/k8s.gcr.io/registry.aliyuncs.com/google_containers/g' /etc/containerd/config.toml

${COLOR_START}"containerd重启及服务永久启动"${COLOR_END}
systemctl restart containerd
systemctl enable containerd

${COLOR_START}"添加apt-key"${COLOR_END}
curl https://mirrors.aliyun.com/kubernetes/apt/doc/apt-key.gpg | apt-key add -

${COLOR_START}"添加Kubernetes的apt源为阿里云的源并更新"${COLOR_END}
#将xenial修改为了jammy,jammy的版本还不成熟,又改回了xenial
apt-add-repository "deb https://mirrors.aliyun.com/kubernetes/apt/ kubernetes-xenial main"
apt update

${COLOR_START}"安装kubelet kubeadm kubectl"${COLOR_END}
apt install -y kubelet kubeadm kubectl
apt-mark hold kubelet kubeadm kubectl
kubeadm version

${COLOR_START}"开启路由功能"${COLOR_END}
sysctl -w net.ipv4.ip_forward=1

${COLOR_START}"加入K8S主节点"${COLOR_END}
#在piM1部署完毕后,会给出token的值,下面的这一大串,改成你自己的token就OK了
  kubeadm join 192.168.3.113:6443 --token 3sg1n6.fmfhugf6vvkmlamm
        --discovery-token-ca-cert-hash sha256:6fc40306eec524a911a38983228bd2ec6e969a590da1a99827153279aaff7cf3
        --control-plane --certificate-key a9f3c1bb90e3cddd5c27d6669b76d8f6d06130851cd0430453187aeecb2aaa67

${COLOR_START}"修改K8S配置"${COLOR_END}
mkdir -p $HOME/.kube
cp -i /etc/kubernetes/admin.conf $HOME/.kube/config
chown $(id -u):$(id -g) $HOME/.kube/config

reboot
6. 在所有的node节点上部署K8S,我选择的是piW1,piW2,piW3。脚本如下:
#切换root用户,在每一个节点安装之前,手动切换为su用户
#sudo su -

#首先设置echo输出的各种颜色和格式
COLOR_START='echo -e 33[35;49m'
COLOR_END='33[0m'

${COLOR_START}"更新软件源,全部切换为阿里云"${COLOR_END}
cat > /etc/apt/sources.list <<EOF
deb http://mirrors.aliyun.com/ubuntu-ports/ jammy main restricted universe multiverse
deb-src http://mirrors.aliyun.com/ubuntu-ports/ jammy main restricted universe multiverse
deb http://mirrors.aliyun.com/ubuntu-ports/ jammy-updates main restricted universe multiverse
deb-src http://mirrors.aliyun.com/ubuntu-ports/ jammy-updates main restricted universe multiverse
deb http://mirrors.aliyun.com/ubuntu-ports/ jammy-security main restricted universe multiverse
deb-src http://mirrors.aliyun.com/ubuntu-ports/ jammy-security main restricted universe multiverse
deb http://mirrors.aliyun.com/ubuntu-ports/ jammy-backports main restricted universe multiverse
deb-src http://mirrors.aliyun.com/ubuntu-ports/ jammy-backports main restricted universe multiverse
EOF

${COLOR_START}"检查更新及安装更新"${COLOR_END}
apt update
apt upgrade -y

${COLOR_START}"安装语言包"${COLOR_END}
apt-get install language-pack-en
apt-get install language-pack-zh-hans

${COLOR_START}"设置HOST的模板文件"${COLOR_END}
cat >> /etc/cloud/templates/hosts.debian.tmpl <<EOF
192.168.3.101 piM1
192.168.3.102 piM2
192.168.3.103 piM3
192.168.3.111 piW1
192.168.3.112 piW2
192.168.3.113 piW3
EOF

${COLOR_START}"关闭SWAP"${COLOR_END}
swapoff -a
sed -i '/ swap / s/^(.*)$/#1/g' /etc/fstab

${COLOR_START}"添加加载的内核模块"${COLOR_END}
tee /etc/modules-load.d/containerd.conf<<EOF
overlay
br_netfilter
EOF

${COLOR_START}"加载内核模块"${COLOR_END}
modprobe overlay
modprobe br_netfilter

${COLOR_START}"设置并应用内核参数"${COLOR_END}
tee /etc/sysctl.d/kubernetes.conf<<EOF
net.bridge.bridge-nf-call-ip6tables = 1
net.bridge.bridge-nf-call-iptables = 1
net.ipv4.ip_forward = 1
EOF

sysctl --system

${COLOR_START}"curl gnupg2 software-properties-common apt-transport-https ca-certificates"${COLOR_END}
apt install -y curl gnupg2 software-properties-common apt-transport-https ca-certificates

${COLOR_START}"安装GPG证书"${COLOR_END}
curl -fsSL https://download.docker.com/linux/ubuntu/gpg |  apt-key add -

${COLOR_START}"写入软件源信息并更新"${COLOR_END}
add-apt-repository "deb [arch=arm64] https://download.docker.com/linux/ubuntu $(lsb_release -cs) stable"
apt update

${COLOR_START}"安装containerd"${COLOR_END}
apt install -y containerd.io

${COLOR_START}"生成containetd的配置文件"${COLOR_END}
#结果数据全部丢弃(重定向到空文件),2>&1代表错误信息输出到标准输出上
containerd config default | tee /etc/containerd/config.toml >/dev/null 2>&1

${COLOR_START}"修改cgroup Driver为systemd"${COLOR_END}
sed -i 's/SystemdCgroup = false/SystemdCgroup = true/g' /etc/containerd/config.toml

${COLOR_START}"将镜像源设置为阿里云 google_containers 镜像源"${COLOR_END}
sed -i 's/k8s.gcr.io/registry.aliyuncs.com/google_containers/g' /etc/containerd/config.toml

${COLOR_START}"containerd重启及服务永久启动"${COLOR_END}
systemctl restart containerd
systemctl enable containerd

${COLOR_START}"添加apt-key"${COLOR_END}
curl https://mirrors.aliyun.com/kubernetes/apt/doc/apt-key.gpg | apt-key add -

${COLOR_START}"添加Kubernetes的apt源为阿里云的源并更新"${COLOR_END}
#将xenial修改为了jammy,jammy的版本还不成熟,又改回了xenial
apt-add-repository "deb https://mirrors.aliyun.com/kubernetes/apt/ kubernetes-xenial main"
apt update

${COLOR_START}"安装kubelet kubeadm kubectl"${COLOR_END}
apt install -y kubelet kubeadm kubectl
apt-mark hold kubelet kubeadm kubectl
kubeadm version

${COLOR_START}"开启路由功能"${COLOR_END}
sysctl -w net.ipv4.ip_forward=1

${COLOR_START}"加入K8S节点"${COLOR_END}
#替换成自己主控节点的token就可以了
kubeadm join 192.168.3.113:6443 --token 3sg1n6.fmfhugf6vvkmlamm
        --discovery-token-ca-cert-hash sha256:6fc40306eec524a911a38983228bd2ec6e969a590da1a99827153279aaff7cf3

reboot
7. 部署集群CNI
现在执行命令kubectl get node -A显示节点状态为NotReady,因为网络还没准备好。
在主控节点上部署CNI网络插件
#安装calico网络插件
kubectl apply -f "https://docs.projectcalico.org/manifests/calico.yaml"
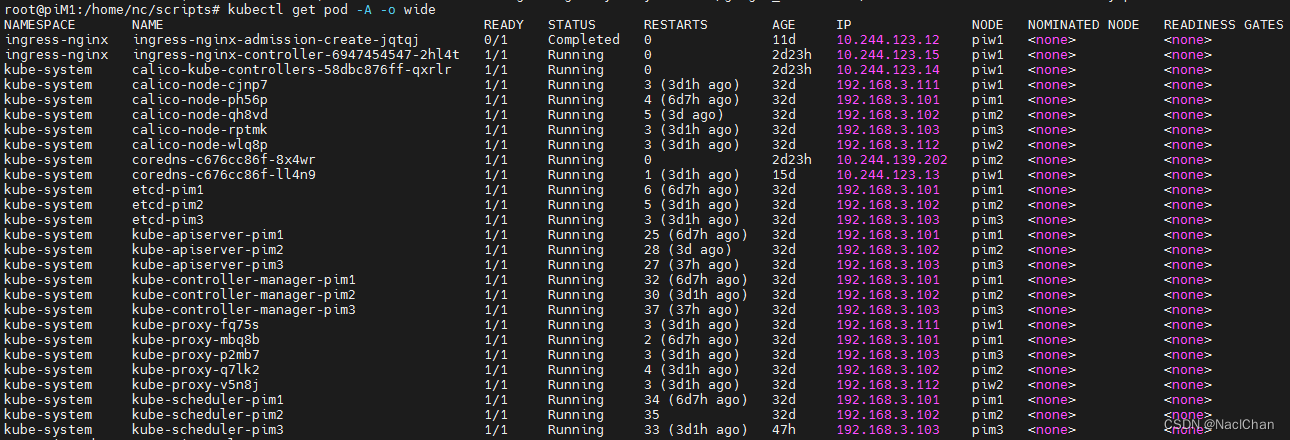
8. 验证部署结果
