Unity:圆底烧瓶中液体液面升降变化的效果
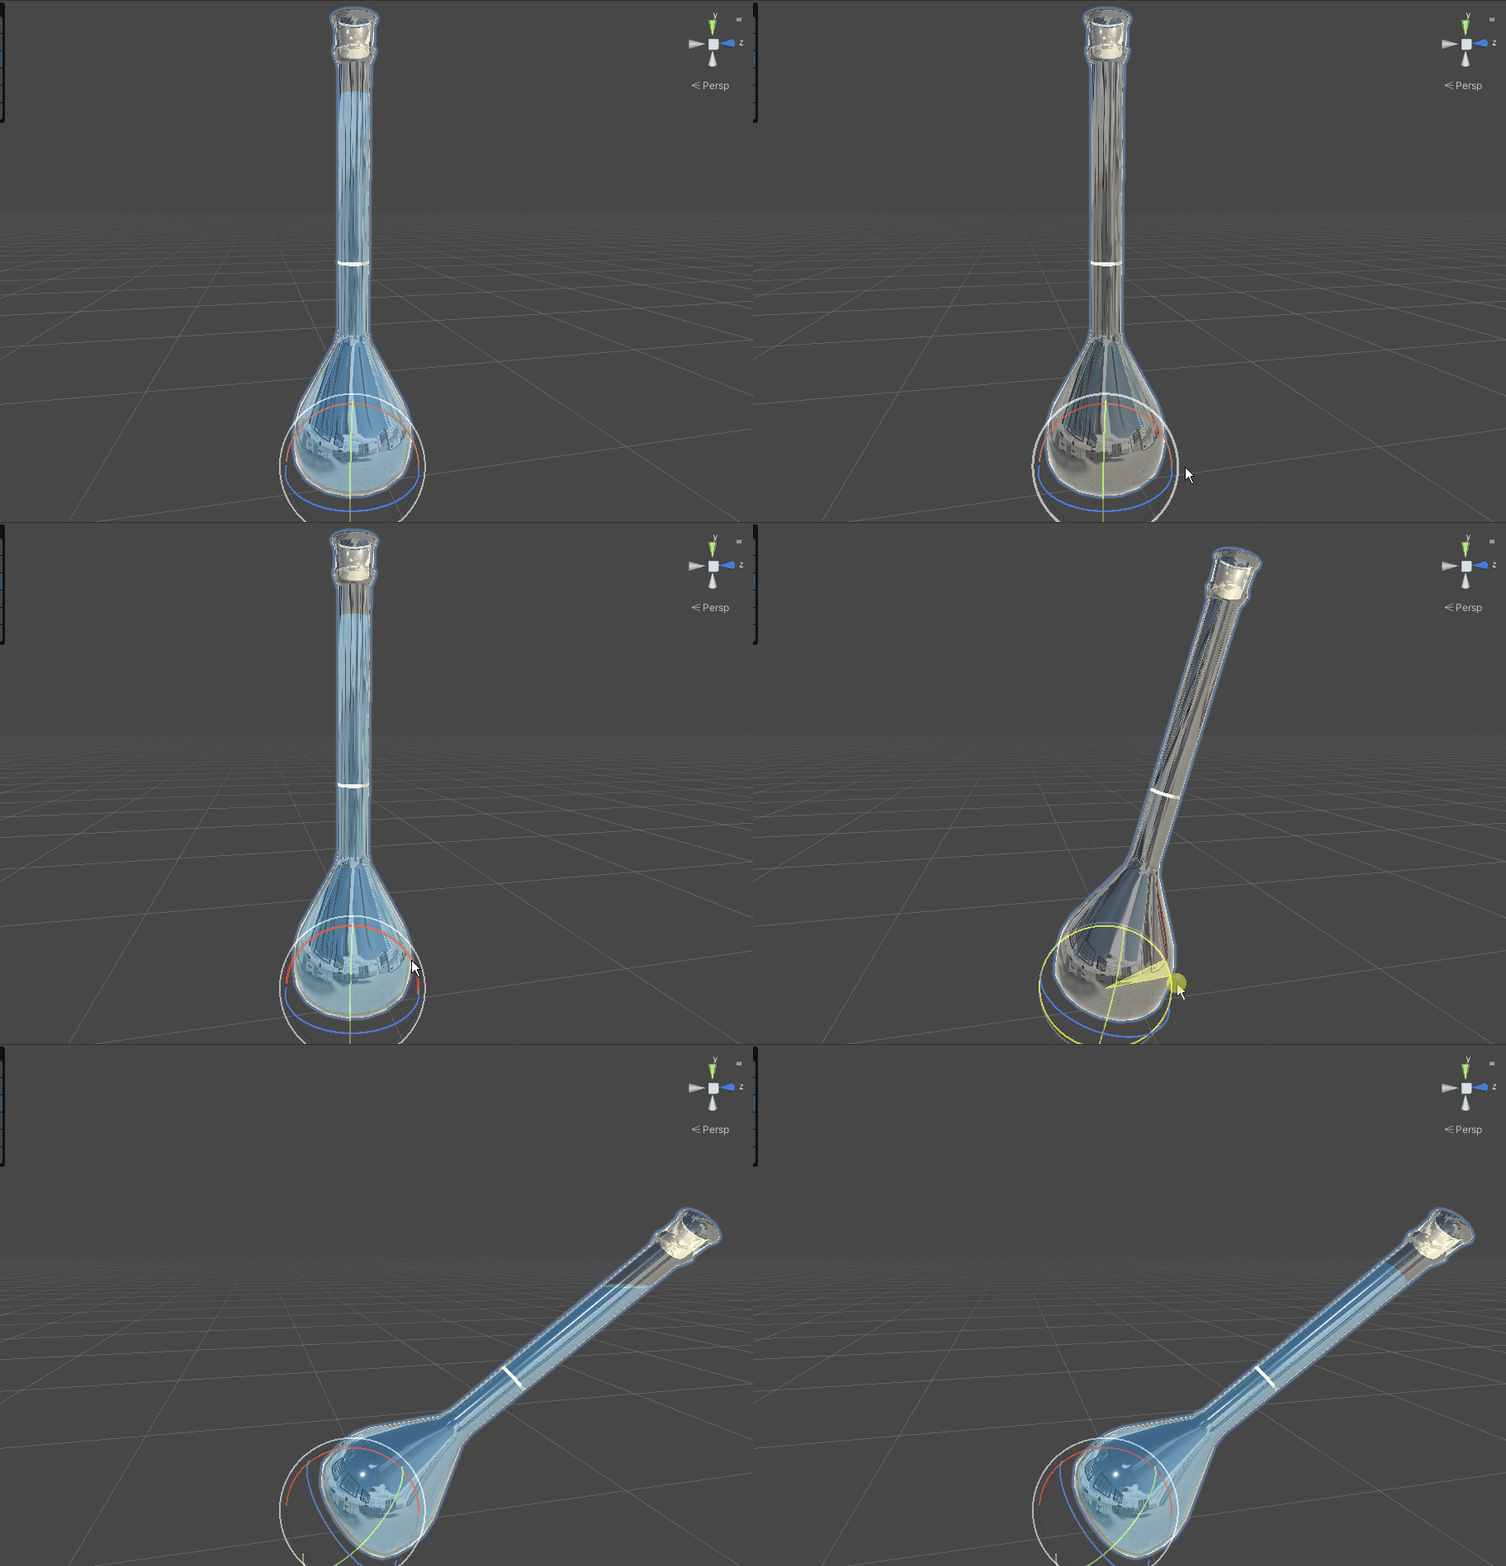
一、效果展示

二、实现的原理
1、从image的filled模式说起
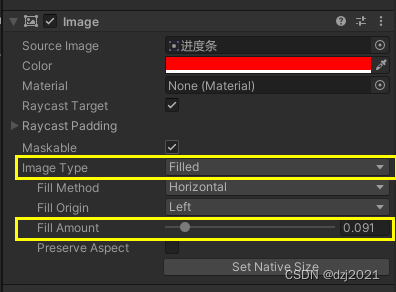
image的filled模式,适合用来做进度条:


2、能否为一个3D object实现一个image filled 的shader ?
Shader "Custom/FilledImageEffect"
{
    Properties
    {
        _MainTex ("Texture", 2D) = "white" {}
        _Color ("Color", Color) = (1, 1, 1, 1)
        _FillAmount ("Fill Amount", Range(0, 1)) = 1
    }

    SubShader
    {
        Tags {"Queue"="Transparent" "RenderType"="Transparent"}
        LOD 100

        CGPROGRAM
        #pragma surface surf Lambert

        sampler2D _MainTex;
        float4 _Color;
        float _FillAmount;

        struct Input
        {
            float2 uv_MainTex;
        };

        void surf (Input IN, inout SurfaceOutput o)
        {
            float2 uv = IN.uv_MainTex;
            float4 c = tex2D(_MainTex, uv) * _Color;

            if (uv.x > _FillAmount)
            {
                c.a = 0;
            }

            o.Albedo = c.rgb;
            o.Alpha = c.a;
        }
        ENDCG
    }
    FallBack "Diffuse"
}
3、液面变化的Shader
Shader "Custom/LiquidBottle"
{
    Properties
    {
        _MainTex ("Texture", 2D) = "white" {}
        _MainColor("MainColor",Color) = (1, 1, 1, 1)
        _TopColor("TopColor",Color) = (1, 1, 0, 1)
        _FillAmount("FillAmout",Range(-1 , 2)) = 0
        _EdgeWidth("EdgeWidth",Range(0 , 1)) = 0.2

        _BottleWidth("BottleWidth",Range(0,1)) = 0.2
        _BottleColor("BottleColor",Color) = (1,1,1,1)

        _RimColor("RimColor",Color)=(1,1,1,1)
        _RimWidth("RimWidth",float)=0.2

    }
    SubShader
    {
        Tags { "RenderType"="Opaque" }
        LOD 100

        Pass
        {
            Cull OFF
            AlphaToMask on
            //ZWrite On
            Blend SrcAlpha OneMinusSrcAlpha
            CGPROGRAM
            #pragma vertex vert
            #pragma fragment frag
            // make fog work
            #pragma multi_compile_fog

            #include "UnityCG.cginc"

            struct appdata
            {
                float4 vertex : POSITION;
                float2 uv : TEXCOORD0;
                float3 normal : NORMAL;

            };

            struct v2f
            {
                float2 uv : TEXCOORD0;
                UNITY_FOG_COORDS(1)
                float4 vertex : SV_POSITION;
                float fillEdge : TEXCOORD1;
                float3 viewDir : COLOR;
                float3 normal : COLOR2;
            };

            sampler2D _MainTex;
            float4 _MainTex_ST;

            float4 _MainColor;
            float _FillAmount;
            float4 _TopColor;
            float _EdgeWidth;

            float4 _RimColor;
            float _RimWidth;

            v2f vert (appdata v)
            {
                v2f o;
                o.vertex = UnityObjectToClipPos(v.vertex);
                o.uv = TRANSFORM_TEX(v.uv, _MainTex);
                UNITY_TRANSFER_FOG(o,o.vertex);
                o.fillEdge=mul(unity_ObjectToWorld,v.vertex.xyz).y+_FillAmount;
                o.normal=v.normal;
                o.viewDir=normalize(ObjSpaceViewDir(v.vertex));
                return o;
            }

            fixed4 frag (v2f i,fixed facing : VFace) : SV_Target
            {
                // sample the texture
                fixed4 col = tex2D(_MainTex, i.uv) * _MainColor;
                // apply fog
                UNITY_APPLY_FOG(i.fogCoord, col);

                float dotProduct = 1-pow(dot(i.normal, i.viewDir),_RimWidth);
                float4 rimCol=_RimColor*smoothstep(0.5,1,dotProduct);

                fixed4 edgeVal=step(i.fillEdge,0.5)-step(i.fillEdge,0.5-_EdgeWidth);
                fixed4 edgeCol=edgeVal *= _TopColor*0.9;

                fixed4 finalVal=step(i.fillEdge,0.5)-edgeVal;
                fixed4 finalCol=finalVal*col;
                finalCol+=edgeCol+rimCol;

                 fixed4 topCol=_TopColor * (edgeVal+finalVal);
                // float dotVal = 1- pow(dot(i.normal, i.viewDir),0.3);
                // return float4(dotVal,dotVal,dotVal,1);
                return facing > 0 ? finalCol : topCol;
            }
            ENDCG
        }

        Pass
        {
            //Cull Front
            Blend SrcAlpha OneMinusSrcAlpha
            CGPROGRAM
            #pragma vertex vert
            #pragma fragment frag
            // make fog work
            #pragma multi_compile_fog

            #include "UnityCG.cginc"

            struct appdata
            {
                float4 vertex : POSITION;
                float2 uv : TEXCOORD0;
                float4 normal : NORMAL;
            };

            struct v2f
            {
                float2 uv : TEXCOORD0;
                UNITY_FOG_COORDS(1)
                float4 vertex : SV_POSITION;
                float3 viewDir : COLOR;
                float3 normal :NORMAL;
            };

            float4 _BottleColor;
            float _BottleWidth;

            float4 _RimColor;
            float _RimWidth;

            v2f vert (appdata v)
            {
                v2f o;
                v.vertex.xyz+=v.normal.xyz*_BottleWidth;
                o.vertex = UnityObjectToClipPos(v.vertex);
                o.uv = v.uv;
                UNITY_TRANSFER_FOG(o,o.vertex);
                o.normal=v.normal.xyz;
                o.viewDir=normalize(ObjSpaceViewDir(v.vertex));

                return o;
            }

            fixed4 frag (v2f i,fixed facing : VFace) : SV_Target
            {
                // sample the texture
                fixed4 col = _BottleColor;
                // apply fog
                UNITY_APPLY_FOG(i.fogCoord, col);

                float dotProduct = 1-pow(dot(i.normal, i.viewDir),_RimWidth);//1-pow(dot(i.normal, i.viewDir),_RimWidth/10);
                float4 rimCol=_RimColor*smoothstep(0.2,1,dotProduct);

                return rimCol;
            }
            ENDCG
        }
    }
}
三、服用方法
-
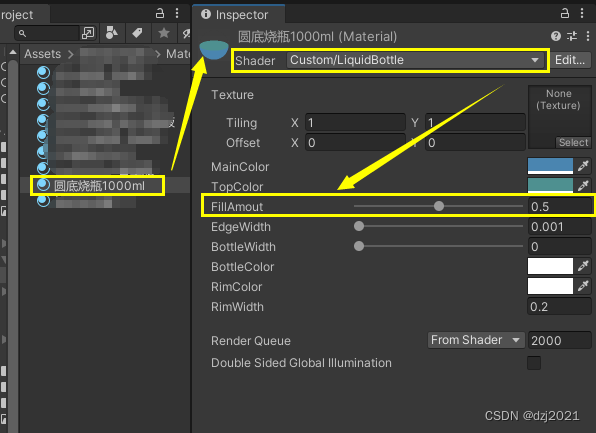
1、创建一个液面效果的材质

-
2、把这个材质挂载到瓶子中的【液体】模型上
-
3、在面板上拖动FillAmout
-
4、在脚本中设置mat的该属性
mat.SetFloat(“_FillAmount”, currentValue);
四、附录:C#调用代码
1、液面升降动画的异步方法
/// <summary>
/// 容器的液面变化:化学实验中,量筒中倒入液体或者被吸取液体后,液面会升降
/// 材质用shader,控制其fillAmout参数
/// </summary>
/// <param name="mat">操作的材质</param>
/// <param name="levelStart">起始液面位置</param>
/// <param name="levelEnd">结束页面位置</param>
/// <param name="duration">动画的时间</param>
/// <returns></returns>
public static async UniTask DoLiquidLevel(Material mat, float levelStart, float levelEnd, float duration)
{
    float currentValue = levelStart;
    float timeElapsed = 0f;
    while (timeElapsed < duration)
    {
        currentValue = Mathf.Lerp(levelStart, levelEnd, timeElapsed / duration);
        Debug.Log(currentValue);
        mat.SetFloat("_FillAmount", currentValue);      //变量名字确保与Shader源码中的变量一致。
        await UniTask.Yield();
        timeElapsed += Time.deltaTime;
    }
    mat.SetFloat("_FillAmount", levelEnd);              //确保最终结果准确
}
2、monobehaviour示例脚本
using System;
using Cysharp.Threading.Tasks;
using UnityEngine;
using static txlib;//包含 DoLiquidLevel()

/// <summary>
/// 容器的液面升降控制
/// </summary>
public class ChangeLiquidLevel : MonoBehaviour
{
    /// <summary>
    /// 物体
    /// </summary>
    public GameObject obj;

    /// <summary>
    /// 起始液面
    /// </summary>
    public float levelStart;

    /// <summary>
    /// 终止液面
    /// </summary>
    public float levelEnd;

    /// <summary>
    /// 动画耗时
    /// </summary>
    public float duration;

    /// <summary>
    /// 材质
    /// </summary>
    private Material mat;

    [ContextMenu("测试液面")]
    async UniTask Test()
    {
        mat = obj.GetComponent<Renderer>().sharedMaterial;
        while (true)
        {
            await DoLiquidLevel(mat, levelStart, levelEnd, duration);
            await DoLiquidLevel(mat, levelEnd, levelStart, duration);
            await UniTask.Delay(TimeSpan.FromSeconds(0.8f));
        }
    }
}