自然语言处理系列(三)——LSTM
注: 本文是总结性文章,不适合初学者
一、结构比较
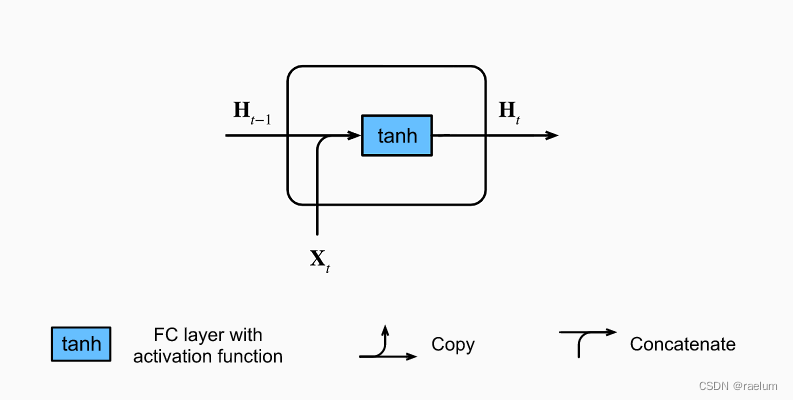
只考虑单隐层单向的RNN,忽略输出层,首先看Vanilla RNN中一个cell的结构:

其计算过程为(设批量大小为 N N N,隐层结点个数为 h h h,输入特征数为 d d d):
H t = tanh ( X t W x h + H t − 1 W h h + b h ) {bf H}_t=tanh({bf X}_t{bf W}_{xh}+{bf H}_{t-1}{bf W}_{hh}+{boldsymbol b}_h) Ht=tanh(XtWxh+Ht−1Whh+bh)
其中各参数的形状为:
- H t , H t − 1 {bf H}_t,{bf H}_{t-1} Ht,Ht−1: N × h Ntimes h N×h;
- X t {bf X}_t Xt: N × d Ntimes d N×d;
- W x h {bf W}_{xh} Wxh: d × h dtimes h d×h;
- W h h {bf W}_{hh} Whh: h × h htimes h h×h;
- b h {boldsymbol b}_{h} bh: 1 × h 1times h 1×h。
在计算时, b h {boldsymbol b}_{h} bh 将利用广播机制从上往下复制成 N × h Ntimes h N×h 的形状。
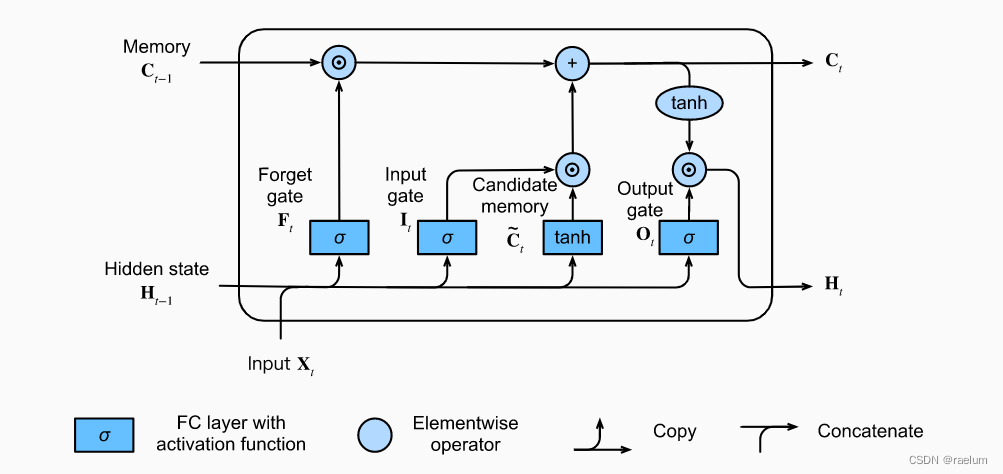
LSTM中一个cell的结构:

其计算过程为(设 σ ( ⋅ ) sigma(cdot) σ(⋅) 代表 Sigmoid ( ⋅ ) text{Sigmoid}(cdot) Sigmoid(⋅)):
I t = σ ( X t W x i + H t − 1 W h i + b i ) F t = σ ( X t W x f + H t − 1 W h f + b f ) O t = σ ( X t W x o + H t − 1 W h o + b o ) C ~ t = tanh ( X t W x c + H t − 1 W h c + b c ) C t = F t ⊙ C t − 1 + I t ⊙ C ~ t H t = O t ⊙ tanh ( C t ) begin{aligned} {bf I}_t&=sigma({bf X}_t{bf W}_{xi}+{bf H}_{t-1}{bf W}_{hi}+{boldsymbol b}_i) \ {bf F}_t&=sigma({bf X}_t{bf W}_{xf}+{bf H}_{t-1}{bf W}_{hf}+{boldsymbol b}_f) \ {bf O}_t&=sigma({bf X}_t{bf W}_{xo}+{bf H}_{t-1}{bf W}_{ho}+{boldsymbol b}_o) \ tilde{{bf C}}_t&=tanh({bf X}_t{bf W}_{xc}+{bf H}_{t-1}{bf W}_{hc}+{boldsymbol b}_c) \ {bf C}_t&={bf F}_t odot{bf C}_{t-1}+{bf I}_todot tilde{{bf C}}_t \ {bf H}_t&={bf O}_todot tanh({bf C}_t) \ end{aligned} ItFtOtC~tCtHt=σ(XtWxi+Ht−1Whi+bi)=σ(XtWxf+Ht−1Whf+bf)=σ(XtWxo+Ht−1Who+bo)=tanh(XtWxc+Ht−1Whc+bc)=Ft⊙Ct−1+It⊙C~t=Ot⊙tanh(Ct)
其中 ⊙ odot ⊙ 是矩阵的 Hadamard 积,各参数的形状如下:
- H t , H t − 1 {bf H}_t,{bf H}_{t-1} Ht,Ht−1、 I t , F t , O t {bf I}_t,{bf F}_t,{bf O}_t It,Ft,Ot、 C ~ t , C t , C t − 1 tilde{{bf C}}_t,{bf C}_t,{bf C}_{t-1} C~t,Ct,Ct−1: N × h Ntimes h N×h;
- X t {bf X}_t Xt: N × d Ntimes d N×d;
- W x i , W x f , W x o , W x c {bf W}_{xi},{bf W}_{xf},{bf W}_{xo},{bf W}_{xc} Wxi,Wxf,Wxo,Wxc: d × h dtimes h d×h;
- W h i , W h f , W h o , W h c {bf W}_{hi},{bf W}_{hf},{bf W}_{ho},{bf W}_{hc} Whi,Whf,Who,Whc: h × h htimes h h×h;
- b i , b f , b o , b c {boldsymbol b}_{i},{boldsymbol b}_{f},{boldsymbol b}_{o},{boldsymbol b}_{c} bi,bf,bo,bc: 1 × h 1times h 1×h
二、LSTM基础
LSTM一共有三个门: I t , F t , O t {bf I}_t,{bf F}_t,{bf O}_t It,Ft,Ot 分别代表输入门、遗忘门和输出门。输入门用来控制采用多少来自 C ~ t tilde{{bf C}}_t C~t 的新数据,遗忘门用来控制保留多少 C t − 1 {bf C}_{t-1} Ct−1 的内容,输出门用来控制向下一个时间步传递多少记忆信息。
对于LSTM,只考虑 batch_first=True 的情形,输入数据的形状为
L
×
N
×
d
Ltimes Ntimes d
L×N×d。此外还需输入
H
0
{bf H}_0
H0 和
C
0
{bf C}_0
C0,其形状均为
1
×
N
×
h
1times Ntimes h
1×N×h。
LSTM 在所有时间步上的输出为 [ H 1 , H 2 , ⋯ , H L ] L × N × h [{bf H}_1,{bf H}_2,cdots,{bf H}_L]_{Ltimes Ntimes h} [H1,H2,⋯,HL]L×N×h 和 [ C 1 , C 2 , ⋯ , C L ] L × N × h [{bf C}_1,{bf C}_2,cdots,{bf C}_L]_{Ltimes Ntimes h} [C1,C2,⋯,CL]L×N×h。其中 H t {bf H}_t Ht 代表 t t t 时刻的隐状态, C t {bf C}_t Ct 代表 t t t 时刻的记忆。
三、从零开始搭建LSTM
不考虑隐层和输出层之间的参数,可以看出LSTM需要学习的参数一共有 4 4 4 组,即: ( W x ∗ , W h ∗ , b ∗ ) , where ∗ = i , f , o , c ({bf W}_{x*},{bf W}_{h*},{boldsymbol b}_{*}),; text{where};*=i,f,o,c (Wx∗,Wh∗,b∗),where∗=i,f,o,c。因此我们可以按组去初始化相应的参数。
LSTM需要学习的参数一共有 3 × 4 = 12 3times4=12 3×4=12 个,相比Vanilla RNN的 3 3 3 个参数多了很多。
首先导入本文代码涉及到的所有包:
import math
import string
import numpy as np
import matplotlib.pyplot as plt

import torch
import torch.nn as nn
import torch.nn.functional as F
我们定义一个函数来初始化一组的参数。注意到每一组参数的形状为 ( d × h , h × h , 1 × h ) (dtimes h,htimes h,1times h) (d×h,h×h,1×h):
def init_group_params(input_size, hidden_size):
    std = math.sqrt(2 / (input_size + hidden_size))
    return nn.Parameter(torch.randn(input_size, hidden_size) * std),
           nn.Parameter(torch.randn(hidden_size, hidden_size) * std),
           nn.Parameter(torch.randn(1, hidden_size) * std)
接下来搭建LSTM(模仿 nn.LSTM,即不包含隐层和输出层之间的参数):
class LSTM(nn.Module):

    def __init__(self, input_size, hidden_size):
        super().__init__()
        self.W_xi, self.W_hi, self.b_i = init_group_params(input_size, hidden_size)
        self.W_xf, self.W_hf, self.b_o = init_group_params(input_size, hidden_size)
        self.W_xo, self.W_ho, self.b_f = init_group_params(input_size, hidden_size)
        self.W_xc, self.W_hc, self.b_c = init_group_params(input_size, hidden_size)

    def forward(self, inputs, h_0, c_0):
        L, N, d = inputs.shape
        H, C = h_0[0], c_0[0]
        outputs = []
        for t in range(L):
            X = inputs[t]
            I = torch.sigmoid(X @ self.W_xi + H @ self.W_hi + self.b_i)
            F = torch.sigmoid(X @ self.W_xf + H @ self.W_hf + self.b_f)
            O = torch.sigmoid(X @ self.W_xo + H @ self.W_ho + self.b_o)
            C_temp = torch.tanh(X @ self.W_xc + H @ self.W_hc + self.b_c)
            C = F * C + I * C_temp
            H = O * torch.tanh(C)
            outputs.append(H)
        h_n, c_n = H.unsqueeze(0), C.unsqueeze(0)
        outputs = torch.cat(outputs, 0).unsqueeze(1)
        return outputs, h_n, c_n
最后搭建模型,此时需要加上线性层(输出层):
class Model(nn.Module):

    def __init__(self, input_size, hidden_size, output_size):
        super().__init__()
        self.lstm = LSTM(input_size, hidden_size)
        self.linear = nn.Linear(hidden_size, output_size)

    def forward(self, x):
        # 全零初始化h_0和c_0
        _, h_n, _ = self.lstm(x, torch.zeros(1, x.shape[1], self.linear.in_features).to(device),
                              torch.zeros(1, x.shape[1], self.linear.in_features).to(device))
        return self.linear(h_n[0])
四、测试我们的LSTM
为了验证搭建好的LSTM是正确的模型,我们需要用它来完成一个任务。
4.1 字符预测任务
通俗点来讲,即给定一个单词(长度为
n
n
n),当模型读取了前
n
−
1
n-1
n−1 个字母后,它能够准确地预测出最后一个字母。例如,对于单词 machine,当模型读取完 machin 后,它应当给出预测结果:e。
需要注意的是,字符预测任务并不是完美的。例如给定前两个字母
be,第三个字母无论是e还是t都能构成一个单词,而测试集是有限的,可能只有唯一的答案。
我们使用单词数据集(下载地址),其中训练集包含了 8000 个单词,测试集包含了 2000 个单词,且训练集和测试集没有重合。
4.2 数据预处理
LSTM无法直接识别字母,因此需要先将单个字母转化成张量(one-hot编码):
def letter2tensor(letter):
    letter_idx = torch.tensor(string.ascii_lowercase.index(letter))
    return F.one_hot(letter_idx, num_classes=len(string.ascii_lowercase))
然后再创建一个函数用于将整个单词转化成对应的张量(这里我们将一个单词视为一个 batch,因此形状为 L × 1 × d Ltimes1times d L×1×d,其中 d = 26 d=26 d=26, L L L 是单词的长度):
def word2tensor(word):
    result = torch.zeros(len(word), len(string.ascii_lowercase))
    for i in range(len(word)):
        result[i] = letter2tensor(word[i])
    return result.unsqueeze(1)
例如:
print(word2tensor('cat'))
# tensor([[[0., 0., 1., 0., 0., 0., 0., 0., 0., 0., 0., 0., 0., 0., 0., 0., 0.,
#           0., 0., 0., 0., 0., 0., 0., 0., 0.]],

#         [[1., 0., 0., 0., 0., 0., 0., 0., 0., 0., 0., 0., 0., 0., 0., 0., 0.,
#           0., 0., 0., 0., 0., 0., 0., 0., 0.]],

#         [[0., 0., 0., 0., 0., 0., 0., 0., 0., 0., 0., 0., 0., 0., 0., 0., 0.,
#           0., 0., 1., 0., 0., 0., 0., 0., 0.]]])
读取训练集和测试集:
with open('words/train.txt') as f:
    train_data = f.read().strip().split('n')

with open('words/test.txt') as f:
    test_data = f.read().strip().split('n')

print(train_data[0], test_data[1])
# clothe trend
此外,为了保证结果的可复现性,我们还需设置种子:
def setup_seed(seed):
    np.random.seed(seed)
    torch.manual_seed(seed)
    torch.cuda.manual_seed(seed)
    torch.cuda.manual_seed_all(seed)
4.3 训练与测试
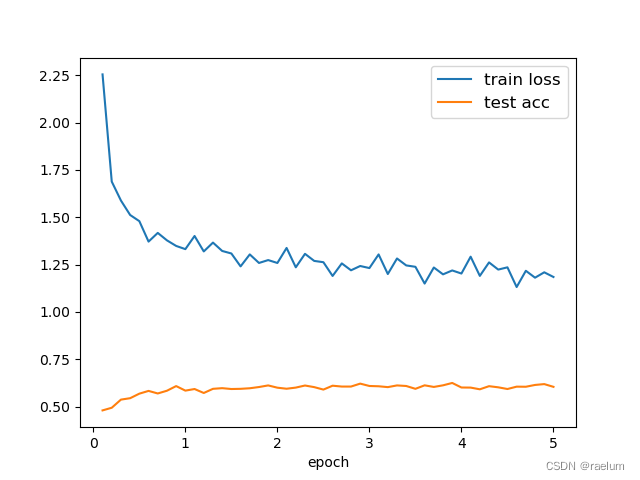
我们将在训练集上训练 5 个epoch,因为 batch_size=1,所以每隔 800 个 Iteration 输出一次损失并计算此时模型在测试集上的准确率,最后绘制相应的曲线。
setup_seed(42)

device = 'cuda' if torch.cuda.is_available() else 'cpu'
# 实际上相当于26分类任务,所以输出层神经元个数是26
model = Model(26, 64, 26)
model.to(device)

LR = 7e-3  # 学习率
EPOCHS = 5  # 多少个epoch
INTERVAL = 800  # 多少个iteration输出一次

critertion = nn.CrossEntropyLoss()
# 采用SGD优化器会出现测试集精度不变的情况
optimizer = torch.optim.Adam(model.parameters(), lr=LR, weight_decay=3e-4)

train_loss = []
test_acc = []
avg_train_loss = 0  # 训练集平均损失
correct = 0  # 模型在测试集上预测正确的个数

for epoch in range(EPOCHS):
    print(f'Epoch {epoch+1}')
    print('-' * 62)
    for iteration in range(len(train_data)):
        full_word = train_data[iteration]
        # 读取的是前n-1个字母,最后一个字母用作target
        X = word2tensor(full_word[:-1]).to(device)
        target = torch.tensor([string.ascii_lowercase.index(full_word[-1])]).to(device)

        # 正向传播
        output = model(X)
        loss = critertion(output, target)
        avg_train_loss += loss

        # 反向传播
        optimizer.zero_grad()
        loss.backward()
        optimizer.step()

        # 每隔800个iteration输出一次损失并计算模型在测试集上的准确率
        if (iteration + 1) % INTERVAL == 0:
            avg_train_loss /= INTERVAL
            train_loss.append(avg_train_loss.item())

            # 计算模型在测试集上的预测准确率
            with torch.no_grad():
                for test_word in test_data:
                    X = word2tensor(test_word[:-1]).to(device)
                    target = torch.tensor(string.ascii_lowercase.index(test_word[-1])).to(device)
                    pred = model(X)
                    correct += (pred.argmax() == target).sum().item()
                acc = correct / len(test_data)
                test_acc.append(acc)

            print(
                f'Iteration: [{iteration + 1:04}/{len(train_data)}] | Train Loss: {avg_train_loss:.4f} | Test Acc: {acc:.4f}'
            )
            avg_train_loss, correct = 0, 0
    print()
这里仅展示最后一个 epoch 的输出:
Epoch 5
--------------------------------------------------------------
Iteration: [0800/8000] | Train Loss: 1.2918 | Test Acc: 0.6000
Iteration: [1600/8000] | Train Loss: 1.1903 | Test Acc: 0.5910
Iteration: [2400/8000] | Train Loss: 1.2615 | Test Acc: 0.6075
Iteration: [3200/8000] | Train Loss: 1.2236 | Test Acc: 0.6015
Iteration: [4000/8000] | Train Loss: 1.2355 | Test Acc: 0.5925
Iteration: [4800/8000] | Train Loss: 1.1314 | Test Acc: 0.6050
Iteration: [5600/8000] | Train Loss: 1.2172 | Test Acc: 0.6045
Iteration: [6400/8000] | Train Loss: 1.1808 | Test Acc: 0.6140
Iteration: [7200/8000] | Train Loss: 1.2092 | Test Acc: 0.6185
Iteration: [8000/8000] | Train Loss: 1.1845 | Test Acc: 0.6040
绘制曲线:
step = INTERVAL / len(train_data)
plt.plot(np.arange(step, EPOCHS + step, step), train_loss, label="train loss")
plt.plot(np.arange(step, EPOCHS + step, step), test_acc, label="test acc")
plt.legend(loc="best", fontsize=12)
plt.xlabel('epoch')
plt.show()

从上图可以看出,模型在测试集上的预测准确率趋于 0.6 0.6 0.6,原因可能有如下几点:
- 数据集的质量不佳;
- 数据集过于简单,LSTM出现了过拟合;
- 我们的任务不够 “自洽”。